Brussels Sprout Skewers

Stuck in a vegetable rut? Not sure what to feed those picky vegetable eaters? I have the cure! BACON!!!!! Yes, bacon nature’s cure to the mundane. Brussels sprouts were as foreign to me as the Chinese language, or Wham!, but on one fateful night, those beautiful mini cabbages rolled into my life. I’ve been obsessed ever since. Believe it or not, there are people out there who aren’t too excited about the idea of brussels sprouts. After these skewers they’ll be begging for more.

Ingredients:
1 16 oz Bag of Fresh Brussels Sprouts
8 Skewers
8 Strips of Turkey Bacon (or pork bacon, if you’re into that sort of thing)
Olive Oil
Salt
Pepper
Garlic
Cayenne Pepper (optional)

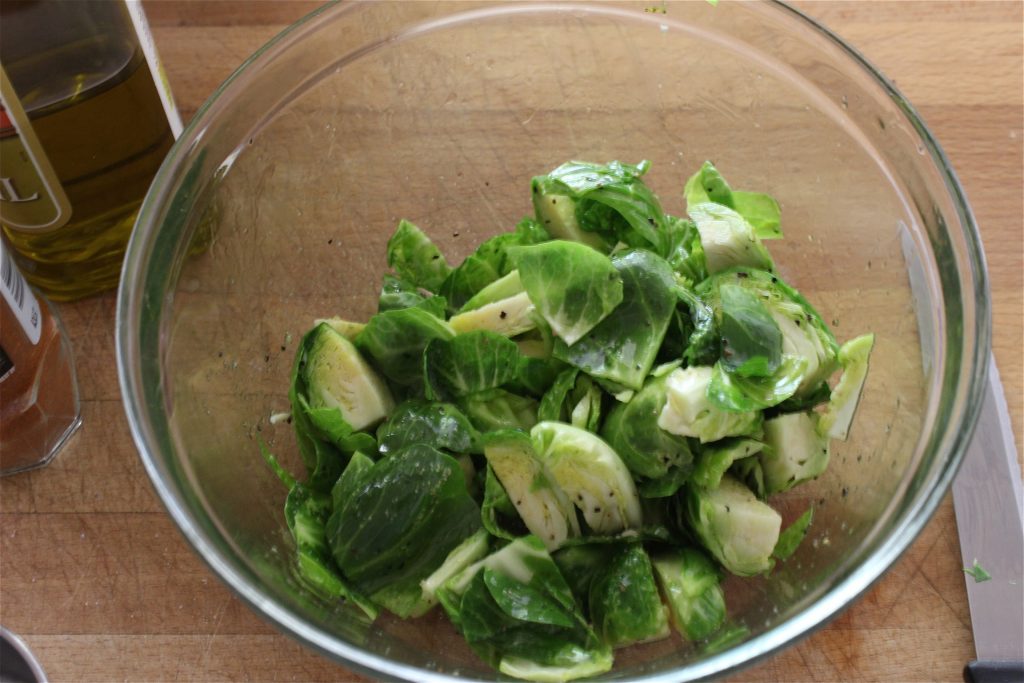
Preheat the oven to 375 degrees. The first step in making Brussels Sprout Skewers is to prep the brussels sprouts. Begin by cutting the hard bottoms off the vegetable and then quartering them (if the brussels sprouts are small you can simply half them).

Place the quartered brussels spouts in a medium size bowl and dress them with olive oil, pepper, salt, and garlic, season them to taste. Toss the brussels sprouts until every quarter has been coated.
IMG_1374

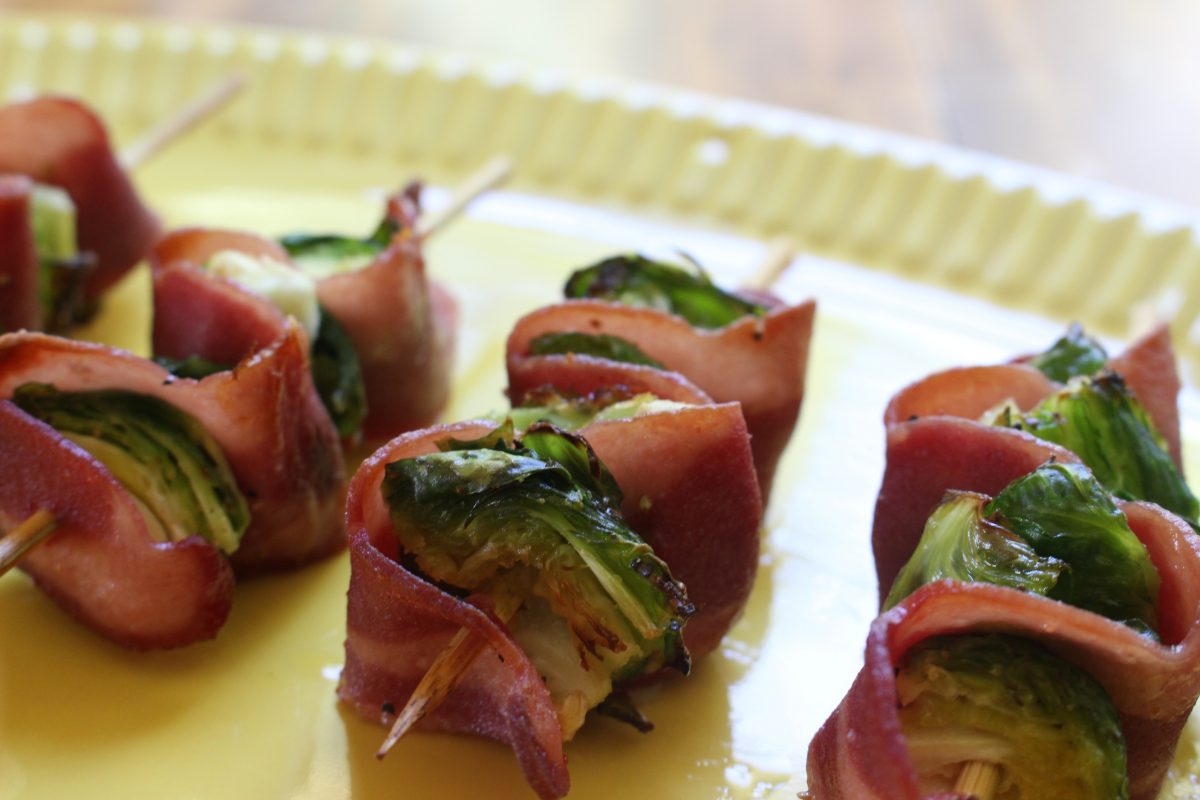
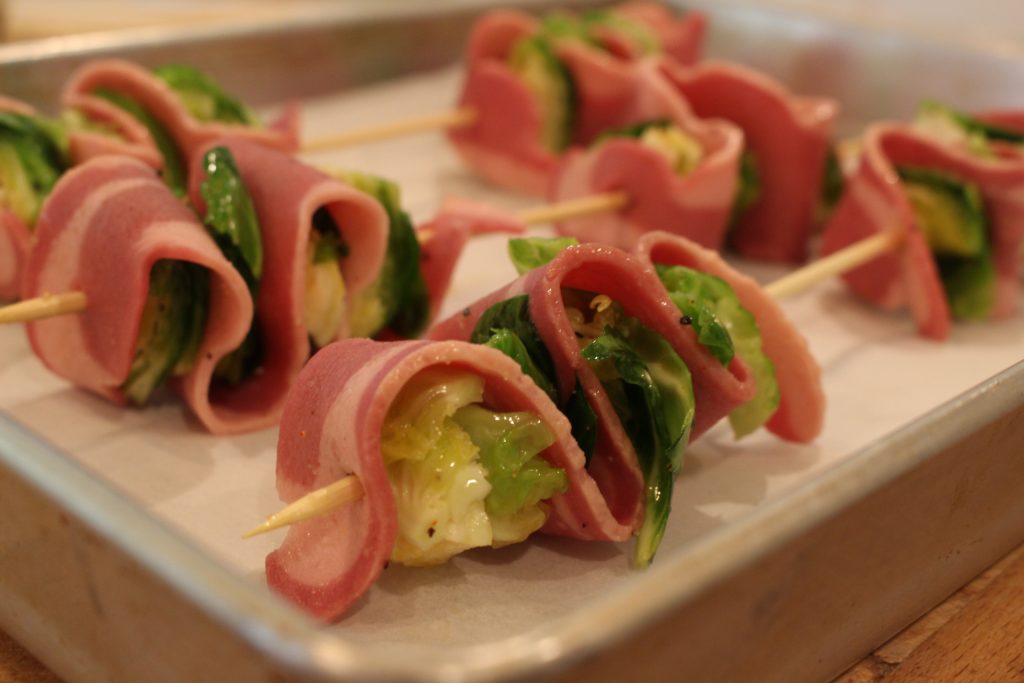
Now, it’s time to make the skewers! Pierce the bacon, at the end the strip, with a skewer. Next, push one of the pieces of brussels sprouts onto the skewer, to meet the bacon. Loop the bacon strip around the veggie and thread it back on the skewer. Continue three more times until there are four brussels sprouts on the skewer and the bacon is at the end. When the sequence is finished, push the items to the top of the skewer and begin the next bacon and brussels sequence at the bottom.
IMG_1379

Put the skewers on a pan and into the oven for about fifteen minutes or until the bacon is crispy and the brussels sprouts are tender. Once the skewers have slightly cooled, cut the skewer in half, so that you have two mini vegetable skewers.
IMG_1393

These are great as appetizers or for a side. Honestly, these skewers have turned brussels sprout haters into lovers… The bacon sure doesn’t hurt ;-).

Icebox Oatmeal Cookie Sandwiches

Ah yes, the winds have changed. Spring is here and Summer is on the horizon! My friends, it is time to rise up and usher our food into the appropriate season! Ice Box Oatmeal Sandwiches anyone? They are the red headed (or should I say the strawberry blonde) step child of an ice cream sandwich. Strawberries have finally made an appearance and I am taking notice! Strawberry babies come on in, make your self comfortable. I won’t bite…. Ok I probably will….

Ingredients:

Cookies:
1/3 c. Brown Sugar
1/2 c. White Sugar
1 Stick Butter
1 Egg
1 tsp. Vanilla
1 c. All Purpose Flour
1/2 tsp. Baking Powder
1/2 tsp. Cinnamon
1/4 tsp. Salt
1 c. Rolled Oats

Cream:
1 c. Chopped Strawberries
1 tbl. White Sugar
1/4 c. Water
1 c. Heavy Whipping Cream

Preheat the oven to 375. Begin by creaming together the butter, white sugar, and brown sugar. Add the egg, vanilla and mix with a hand mixer.

In a separate bowl whisk together the flour, baking powder, cinnamon, and salt. Once the flour mixture is thoroughly mixed, stir in the butter mixture. Next step is to add the rolled oats. When cookie batter is ready, make evenly sized balls and place them on a parchment lined cookie sheet (make sure to space the cookies about 2 inches apart). Using the bottom of a cup, flatten the balls (wet the bottom of the glass with water or oil so it doesn’t stick to the batter). Bake the cookies for 15 minutes or until golden brown.
IMG_1197

Once the cookies are finished baking, remove them from the sheet and place on a wire rack to cool. This recipe should make about 14 medium sized cookies.

As the cookies cool it’s time to make the cream. Place the chopped strawberries in a small saucepan. Add water and sugar to the pan and let the mixture simmer. After about 5 minutes the strawberries will begin to break down. Once the strawberries have softened and the mixture is smooth, it’s ready to remove the saucepan from the heat and cool. Allow the strawberry sauce to cool completely before making the cream.

Now that the strawberries are cooled, it’s time to make strawberry cream! In a large bowl place the heavy whipping cream and strawberries. Using a hand mixer, whip the cream until it resembles whipped cream.

Fill a piping bag (a plastic bag with the tip cut off will work just as well) with the strawberry whipped cream. Pipe the cream on to the bottom of one cookie. Find a cookie that matches in size and top the cream with another cookie, making a sandwich. Once all the sandwiches are made, place them in the freezer for about an hour or until the cream has hardened.
IMG_1220

Once the cream has hardened, melt some chocolate. I used semi sweet, but any chocolate will be delicious. Dip one side of the cookie into melted chocolate and place each one back in the freezer for another hour.

After the cream and chocolate have set, the sandwiches are ready to eat! Make sure to hide one or two of these yummies for yourself because everyone will want seconds.

Chalkboard Calendar

Have you already started your Spring cleaning? Me neither! But, it’s never too late. Spring cleaning always leads to Spring organization and Spring organization always leads to Spring… calendar making? Yep, Spring calendar making, it’s a must! Out with the old, in with the new! This calendar is a triple threat: calendar, bulletin board, and chalk board. No need to look further for your future planning needs. Grab your cork board, a hot glue gun, spray paint and meet me in the backyard!

Materials:

1 18″X24″ Cork Board
4 pkg. 2″X 2″ Multi Color Post-its
1 can Spray Chalk Board Paint
Hot Glue Gun
Chalk
Sharpie

Begin with your cork board (I used a board that I had lying around the house. (Goodwills are littered with homeless cork boards, so you can always pick up a cheap one from there). Lay down cardboard or any other protective material so that the spray paint doesn’t get on the surface you are working on. Spray paint your board making slow, even strokes.
IMG_1078

After your cork board is completely coated, allow it to dry for 20 minutes. Repeat the process two more times. Once you are finished with your last coat, let the board completely dry, which takes about an hour or so.

Next step is to glue on your Post-its. Divide the Post-its evenly and make sure to have enough piles for 5 weeks. Space the Post-its evenly on your board and hot glue them in place. All the Post-its will follow the first row so make sure the first one is straight and evenly spaced. Once you are all done hot glueing the rest of the Post-its, it’s time for the finishing touches.
IMG_1080

Add the numbers to your calendar and using the chalk add the month.
IMG_1106

This calendar will at least make it fun to check on all your daily appointments and bill payments.

Lasagna Done Right

I have always felt a strong connection to Garfield. Yes, the orange striped cat. I’m not sure if it’s that we both have big eyes or hate Monday’s, or possibly, it’s our undying love for lasagna. Yep, thats it! I mean, that cat knew how to eat! Pasta is good, who doesn’t like pasta? But lasagna, lasagna is a whole other entity. It’s ranks among the greatest inventions ever to come out of Italy. And this recipe ranks above all recipes. Trust me when I say, “Garfield would marry this lasagna and have its babies.”  And the truth is, I don’t blame him.

*warning: not suitable for vegans, vegetarians, pescatarians, gluten free people, and the lactose intolerant. Sorry :-(.

Ingredients:

1 lb. Ground beef
1 lb. Italian sausage
1 package of Lasagna noodles
2 c. Mozzarella cheese
3 cans (28 oz) Crushed tomato sauce
4 Slices stale bread
6 Hard boiled eggs
1 Egg
grated Parmesan cheese
Salt
Pepper
Garlic

Begin by adding a small amount of olive oil to a large pot. When the oil is ready add the sausages and fry until they are brown. Once the sausages are browned, add the tomato sauce. Keep the tomato sauce on low heat.
IMG_0931

While the sauce simmers, submerge 4 pieces of stale bread in water. Once the bread is soaked, squeeze out all the excess water and place them in a large mixing bowl. Add the 1 pound of ground beef, 1 egg and thoroughly mix. Season with salt, pepper and garlic powder to taste. Form medium sized balls with the ground beef mixture. In a frying pan, coated with vegetable oil, fry the meat balls until they are browned on both sides. When they are finished cooking, place all the meatballs into the sauce. Allow the sauce to simmer for 1 to 2 hours.
IMG_0945

As the sauce simmers, hard boil 6 eggs. After the eggs are cooked, allow the eggs to cool. Roughly chop the eggs and set aside to use later.

After 2 hours your sauce is ready and the meatballs and sausage are ready to be removed. Remove the meatballs and sausage from the sauce. Roughly chop the meat. Then, boil water to cook the lasagna noodles. Once the water is boiling, add the noodles and cook for about 10 minutes. Once the noodles are cooked, remove the pot from the stove and add cool water to it so that the noodles will be cool enough to handle.
IMG_0974

Use a large baking pan to assemble the lasagna (Depending on how large the pan, will determine how many layers your lasagna will have). Begin by ladling a small amount of sauce on to the bottom of the pan. Follow the sauce with a layer of noodles. Next, layer the chopped meats, hard boiled eggs, mozzarella, and parmesan cheese. Once the first layer is down, ladle more sauce on top and begin the next layer. Continue until you are out of noodles or reach the top of your pan.
IMG_1008

Heat the oven to 325 degrees. Bake the Lasagna for about 35 minutes and enjoy.
IMG_1016

Three Smoothies for Spring

It’s finally the first week of Spring! I think many of us thought we wouldn’t make it… and by us, I mean me :-). Flowers are finally blooming and new fresh fruits and veggies are at the ready! Time to make some sweet smoothies with our fruity friends. But where to begin?!?! Don’t worry, I’ve got your back! Three smoothie recipes to make your day brighter and full of flavor. Let start this Spring off the right way. Get a pep in our step and a smoothie in our bellies. To the blender!

Strawberry Chocolate Smoothie
IMG_0892
Ingredients:

8 Large strawberries
1 C. Chocolate Coconut water
1 Banana
1/2 Tbl. Honey
2Ttbl. Greek Yogurt
A handful of spinach
5 Ice cubes

Put all the ingredients in the blender and liquify until all the ingredients have mixed and completely blended. I’m no doctor, but this smoothie has enough potassium help with effects of any late night.

PBJ Smoothie
IMG_0882

Ingredients:

1C. Almond Milk
3 Tbl. Nut butter (I used almond butter but you can use whatever you like)
2 Tbl. Greek Yogurt
1/2 C. Blueberries
A few ice cubes

Blend all the ingredients until the drink is smooth and creamy. Yes, I do love peanut butter and jelly sandwiches, I mean who doesn’t?! Try this smoothie out. Trust me you won’t be disappointed.

Chai Tea Latte Smoothie
IMG_0902

Ingredients:
1 Tea bag Chai Tea
1/2 Tsp. Cinnamon
1/4 Tsp. Ginger
1/4 Tsp. All Spice
1/4 Tsp. Nutmeg
1/4 Tsp. Cloves
1 Tsp. Maple Syrup

1/4 C. Greek Yogurt
1/4 C. Rolled Oats
1 Banana
1 Ttbl. Maple Syrup
A handful of ice cubes

Begin by steeping the Chai tea. Add all the spices and 1 Tsp. of maple syrup to the hot tea water and let it cool. This tea can be made the night before and cooled. It makes enough for two smoothies.

Once the tea is cooled add a 1/2 cup of Chai tea to the blender along with the Greek yogurt, rolled oats, banana, and maple syrup. Liquify the ingredients until everything is thoroughly blended. This smoothie is a great way to start your day. It has caffeine to get you going, and banana and oats to keep you going.

Irish Soda Bread with a Twist

Ah yes, St. Patrick’s day! A day of corned beef and cabbage, irish soda bread and the very special elixir that cures all aliments, green beer. Now, I think we can all agree that there isn’t any need to improve corned beef or cabbage, or even that beautiful green beer. But, Irish soda bread….. Irish soda bread just needs a 21st century update. You might call it Irish soda bread with a twist…. maybe a chocolate twist. You’re welcome! I’m not Irish, you might not be Irish but, on St. Patrick’s day, we are all Irish! So, lets eat, drink, and be merry!

Ingredients:

3 c. All Purpose Flour
1/3 c. Sugar
1 tsp. Baking Soda
1 1/2 tsp. Salt
1/2 Stick Butter
1 1/2 c. Greek Yogurt
1 Egg
1/2 c. Currants or Raisins
1/2 Bar of Semi-Sweet Chocolate

*Extra 1 tb. of butter for middle spread and flour for kneading

Begin by preheating the oven to 375 degrees. Measure half of a cup of currants (raisins) and finely chop the chocolate bar. Reserve both for later.
IMG_0786

Using a mixer with a paddle attachment, mix together the flour, sugar, baking soda and salt. Next, add half of a stick of softened butter and mix thoroughly. In a separate bowl combine the Greek yogurt and egg. Then add the egg and yogurt to the flour mixture until it becomes dough.
IMG_0799

When the dough is formed, dump it onto a floured surface and knead in the half of a cup of currants. Once the currants are evenly dispersed, roll the dough out about a 1/2 of an inch thick. Melt a tablespoon of butter and brush onto the rolled out dough. Sprinkle the chopped chocolate evenly over the dough and roll it up into a loaf.
IMG_0805

Line a loaf pan with parchment paper and place the dough in the pan. Bake for about 45 minutes or until it is golden brown.
IMG_0826

Body Butter

We are almost there…. Spring is only a few days away! We’re gonna make it! Mmm… short sleeve shirts, sunny weather, and dare I say, ” Shorts???” Mama just bought a new pair of shorts and I can’t wait to wear them! 60 degree weather and shorts just don’t match… trust me I tried. Oh, but you’re saying, “No, no, no skin isn’t ready! It’s still recovering from winter!” Don’t worry, my babies. This body butter is going to show you the way to Spring, and softer skin ;-).

Ingredients:

1/3 c. Shea Butter
1/3 c. Cocoa Butter
1/3 c. Coconut oil

Place Shea butter, Cocoa butter and Coconut oil in a small sauce pan. On a low heat begin to melt the butters and oil. Once the ingredients are completely liquified remove from heat and place in the freezer.

Leave the body butter mixture in the freezer until it is completely hardened (around 45 minutes).
IMG_0703

Next, using a hand mixer whip the body butter so that the mixture becomes light and creamy.
IMG_0715

Put the the body butter in a container and let it set in the refrigerator for about 10 minutes. Once the body butter is set, slather it all over your sweet bod and get ready for the warm days of spring!
IMG_0729

Pumpkin Apple Dog Cookies

We are finally escaping the DOG DAYS OF WINTER! So, let’s treat our dogs in celebration! These dog cookies are great for Pups-giving, a Dog-mitzvah , or just a treat at the end of a long day of digging and fetching. My dog, Orbit, says, “Never have pumpkin and apple ever tasted so good!.” He gives them two paws up!

Ingredients:

2 c. Whole wheat flour
2 Eggs
1/2 c. Pure pumpkin
1/2 tsp. Salt
1/2 Diced apple

Makes 20 3in x 1 1/2in cookies

Preheat the oven to 325 degrees. Combine the eggs and pumpkin together. Next, add the flour and salt and mix until the dough begins to form (the dough might be slightly dry, the apples will fix that). Last but not least, add the diced apples.
IMG_0549

Turn out the dough on to a floured surface and knead a few times. Before rolling out the dough, dust the surface one more time. Roll out the dough to a 1/4 of an inch. Using cookie cutters, cut out the cookies and place on a parchment lined baking sheet.
IMG_0564

Bake cookies for 20 minutes. Flip over and bake another 20 minutes. Let the cookies completely cool before letting your furry friends enjoy them.
IMG_0594

Biscuit Bread Pudding

Like Bert and Ernie, Harold and Maude, Marge and Homer, Bread and Pudding were meant for each other. I love bread! If it was nutritionally and socially acceptable to just eat bread, I would! So, when I was a kid and learned that one could eat various forms of bread for breakfast, lunch, dinner and now dessert, I was in! You can’t go wrong with bread pudding, especially when it’s made with Southern biscuits. So, get your fork ready and grab a napkin because I know you’re already drooling.

Ingredients:

3 Southern Biscuits
1/2 tsp. Almond extract
1/2 c. Heavy whipping cream
1/2 c. Brown sugar
1/3 c. Maple syrup
2 tbl. Butter
1 Egg

Biscuits:

2 c. Flour
1 tbl. Baking powder
1/2 tsp. Salt
1/2 c. Butter
3/4 c. Buttermilk

Enough for 4

Begin by making the biscuits. Preheat the oven to 450 degrees. Mix the dry ingredients together and cut in the butter until it resembles crumbles. Add the buttermilk and mix until the dough begins to form. Dust the surface with flour and roll out the dough so that it is 1/2 in. thick. Using a circle cutter (a drinking glass will work too) cut out biscuits and place them on a baking sheet. Bake for about 10 minutes or until the biscuits begin to brown.
IMG_0208

After the biscuits have been cooled, tear apart 3 biscuits into a baking dish and set aside until you are ready to use them.
IMG_0224

Preheat the oven to 350 degrees. In a mixing bowl cream the butter and sugar. Next, add the almond extract, cream, maple syrup and egg. Once the cream mixture is smooth, pour over the biscuits chunks and place them in the oven. Bake for about 35 minutes
(If the mixture seems runny, bake a little longer).
IMG_0228

While the bread pudding bakes, it’s time to prepare the whipped cream. Using the leftover heavy whipping cream, use a hand blender and whip. After taking the bread pudding out of the oven, let it cool for five minutes and top with whipped cream.
IMG_0227

*This recipe can be made with leftover frozen biscuits.

Egg and Polenta

Stop yoking around! This recipe is egg-straordinary. I wasn’t at the wall when Humpty Dumpty fell but I heard his last words were “Put me in some boiling water and place me on a bed of polenta.” I may be paraphrasing…. but who are you to go against a dying egg’s wish?! Not I, thats for sure. Humpty Dumpty you were one good egg. Now, we don’t know why you were on the wall that fateful day but we all do wish you hadn’t fallen….I’m sure you made one delicious breakfast for someone though. RIP Humpty.

Makes enough for 4

avocado cream:
1/4 c. greek yogurt
1/2 an avocado
1/2 tsp. lime juice
1/8 tsp pepper
1/4 tsp. garlic
pinch of salt

4 eggs
4 pieces of bacon

Spinach:
1 bag of spinach
1/2 onion
2 cloves of garlic
1/8 tsp. pepper
Olive oil

Polenta:
1 c. polenta (corn grits)
3 c. water
1/2 tsp. salt

Start by making the polenta. Put 3 cups of water and 1/2 teaspoon of salt in a saucepan and bring to a boil. Once the water begins to boil, stir in the cup of polenta. Remember to stir the polenta frequently otherwise it will stick to the bottom of the pan, cook until it is very thick (about 20 minutes). Add two tablespoons of butter to the polenta and stir. Now, put the thick polenta onto some plastic wrap and roll it up like you would with sugar cookie dough. Put the log of polenta in the fridge to firm up (10-15 minutes).
IMG_0372

Meanwhile, place 1/4 cup greek yogurt and half an avocado in a bowl. Add the lime juice, salt, pepper, and garlic. Using a hand blender whip up the avocado mixture until its smooth. Place a piece of plastic wrap on the surface of the avocado so that it doesn’t turn brown while in the fridge. Keep the avocado cream in the fridge until you are ready to use it.
IMG_0378

Heat up olive oil in a frying pan, when the oil is hot place the bacon in the pan and fry them up. Once the bacon is crisp, remove it from the pan and keep aside till later. Add the onion and garlic to the pan. Just before they are finished cooking add the spinach (For four people I used almost a whole bag of spinach). When the spinach, garlic, and onion is fully cooked put the mixture in a bowl. Crumble three of the bacon strips into the spinach mixture and set aside.
IMG_0383

Get the polenta out of the fridge and unwrap the log. Make slices about 3/4 of an inch thick. In the same pan the bacon and spinach was cooked, place the polenta (you’ll want to add a little more olive oil at this point). Begin frying the polenta. Once it is slightly brown on one side flip it over and do the other side.
IMG_0387

Once the polenta is finished browning remove from heat and begin boiling your water for the eggs. While you are waiting on the water to boil you can assemble the plates. First, place the spinach mixture and then the polenta on top.

When the water begins to boil place the egg in the water and then lower the heat (poached eggs take about 3 minutes). Using a slotted spoon, take the eggs out of the water one at a time. Place the poached egg on top of the polenta and top with avocado cream. For decoration break the remaining bacon strip into four parts and place them on top of the avocado cream.
IMG_0399

*The polenta recipe will make more than four plates.